Poor man's Jupyter Notebook
Jupyter Notebooks are everywhere. In my Engineering Department, they are the student’s first introduction to programming. They are particularly popular among trendy “data science” types. The concept certainly has advantages:
- Interactivity: If something breaks in your code, you can fix the bug and continue running the notebook, because all the variables are held in memory. Iterative development is much faster. This is what pushed me away from Python and towards MATLAB when I began to use programming in anger as a first-year PhD student. I know better now.
- Cloud development: You can run your programs on somebody else’s computer (e.g. Google Colab), so that you only need a web browser to code. This is not really my thing, but it does reduce barriers to entry.
- Saved output: Printed text and rendered plots are stored in the notebook. This makes it easy to refer back to your results, but some care is needed to make sure the plots remain in sync with the code.
However, I don’t like them for the following reasons:
- Not my editor: I am a keen VIM user, to the extent that typing anything significant outside of VIM is jarring. The Jupyter VIM shortcuts are only an approximation and not as customisable as real VIM. An emacs user would have the same problem.
- Bloat: Web browsers are not exactly paragons of lightweight and elegant software. I see no need to use 800MB of my RAM to run even a trivial Python program.
- Awkward version control: The ipynb format does not play well with git. Code is mixed with output in a big json file. The typical workaround is to only commit markdown files exported from Jupyter, not the notebooks themselves (which loses the saved output).
This short post describes a workflow to replicate the key functionality of Jupyter notebooks using your favourite editor: running code interactively using a REPL; and nicely rendering outputs adjacent to the code that generates them.
Interactive running
The vanilla Python REPL is fine, but ipython has a lot more features to make interactive Python development easier. In fact, Jupyter notebooks use ipython under the bonnet, so we can achieve feature parity in that regard.
Now we need a way of getting blocks of code from our favourite editor into
ipython. Fortunately the plugin
vim-slime has machinery to do this for
us in a general way. I use the tmux
terminal multiplexer, but there are other options. I like to have VIM open in a
left-hand pane, and ipython on the right-hand pane. To set this up needs a few
lines of configuration in ~/.vimrc as follows:
" Send code to next tmux pane
let g:slime_target = "tmux"
let g:slime_dont_ask_default = 1
let g:slime_default_config = {"socket_name": "default", "target_pane": "1"}
Then in ~/.vim/ftplugin/markdown.vim I do the set up for sending Python code
from a backtick-fenced block in a Markdown file, and make some convenience key mappings:
" Configure slime for Markdown/Python notebooks
let b:slime_cell_delimiter = "```"
let b:slime_bracketed_paste = 1

" Move by cells
nnoremap ]] /```python<CR>zoj
nnoremap [[ ?```python<CR>zoj

" Run cell in interpreter
nnoremap <CR> <Plug>SlimeSendCell

" Run cell and move to next
nnoremap <leader><CR> <Plug>SlimeSendCell/```python<CR>zoj
Compiling to pdf
We have now brought the interactivity of Jupyter notebooks to VIM. What is missing is collecting printed and plotted outputs and saving them. We can’t do that within the Markdown file itself, but one procedure could be:
- Start with a Markdown file with explanatory text and some Python code blocks;
- Add print statements at the beginning of each code block to delimit text output;
- Strip out explanatory text to make a valid Python script;
- Run the script and collect output, splitting on our delimiter;
- Insert output into the Markdown code after each block;
- Look for any figures saved in each block, and add images to the Markdown;
- Run
pandocon the augmented Markdown to generate a pdf document.
I have knocked together a Python script which implements the above steps. Being for my own personal use, it is not my finest work, but of course the source is available. You might find it useful to adapt to your case.
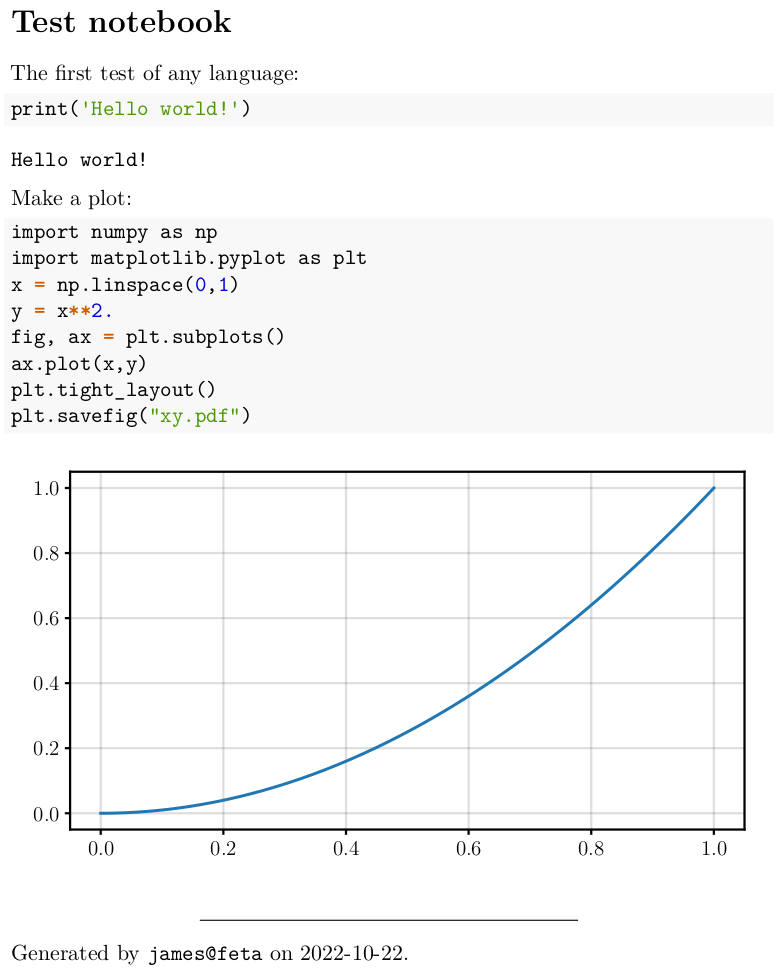
Suppose we have a Markdown file which looks like this:
# Test notebook

The first test of any language:

```python
print('Hello world!')
```

Make a plot:

```python
import numpy as np
import matplotlib.pyplot as plt
x = np.linspace(0,1)
y = x**2.
fig, ax = plt.subplots()
ax.plot(x,y)
plt.tight_layout()
plt.savefig("xy.pdf")
```
Running it through my script produces this pdf:

So we have a way of saving outputs — keeping plots adjacent to the code that generated them for future reference, but in a separate file so as to produce clean git diffs.
Outlook
This post described my workflow, a ‘poor man’s Jupyter notebook’, for interactive Python development. I am using it for my research at the moment, and because it is composed of separate interfaceable tools, I can adapt and customise it as time goes on. Future improvements will appear on this blog!